Ellen's Pregnancy Dance Dare!
My best friend and I used to do really weird and crazy things in public to get a rise out of people our ourselves in high school. We would pretend to interview people on elevators, stare at people on the bus then furiously scribble stuff down on paper and stare again, among many other things. I love the Ellen show and I saw that she was asking for pregnant women to join her dance dare. This was our calling!!! We did it and I hope you enjoy!

Sunday, 29 April 2012
Tuesday, 24 April 2012
Delicious Black Bean Brownies

My daughter usually refuses to eat meat, so I have been trying to come up with interesting ways to get extra protein into her. I came across black bean brownies and thought I would give it a shot. They turned out great! They taste great, I can't keep a pan in the house for more than a day without them all disappearing. Here is the recipe I use.
Ingredients
- 1 (540 ml) can black beans, thoroughly drained and rinsed
- 3/4 cup sugar (you can probably go down to 1/2 if you don't like things too sweet)
- 1/4 cup cocoa powder
- 1/4 tsp salt
- 3 eggs
- 2 tbl oil (I have used coconut and olive oil both work great)
- 1 tsp vanilla
- 1 tsp instant coffee (this is optional but I highly recommend it)
- 1/4 nuts (optional)
- 1/3 cup semisweet chocolate chips (optional but also recommended)
Spray an 8X8 pan or I use an 8X11 pan with Pam. Preheat oven to 350.
Put your black beans, sugar, cocoa powder, salt, eggs, oil, vanilla and coffee into a food processor and pulse until mixture is smooth.
Pour mixture into pan and sprinkle your nuts, and chocolate chips on top.
Bake in oven for 30 minutes. Cool completely before cutting.
This brownies are healthy, tasty and moist! ENJOY!
Nutritional Info (16 servings, without nuts)
Calories per brownie 105
Total grams of fat 4g
Nutritional Info (16 servings, without nuts)
Calories per brownie 105
Total grams of fat 4g
Sunday, 15 April 2012
Rainbow Cake
This is the best white cake recipe ever! I make it all the time, and my Mom has made it for the family for years. Every time it is made people devour it! I used this recipe for the Rainbow Cake. It is from Bon Appetit (June 1994)


Cake (make two batches of this separately for the 6 layers)
Ingredients
- 3 cups cake flour (I used All Purpose)
- 1 tbl baking powder
- 3/4 tsp salt
- 3/4 cup unsalted butter, room temperature
- 1 3/4 cups of sugar
- 4 large eggs, separated
- 1 tsp vanilla extract
- 1 tsp coconut extract (optional)
- 1 398ml (14 oz) can unsweetened coconut milk
- 1/4 tsp cream of tartar
- 6 colors of gel food coloring
Directions for Cake
Preheat oven to 350 F. Line bottoms of two (or three if you have three, it would make it less time) 9-inch-diameter cake pans with 2-inch high sides with waxed paper. Sift flour, baking powder and salt into large bowl. Using an electric mixer, beat butter in large bowl until smooth, gradually add sugar and beat until light and fluffy. Add yolks 1 at a time, beating well with each addition. Mix in vanilla and coconut extracts. Add dry ingredients to butter mixture alternately with coconut milk, beginning and ending with dry ingredients and beating until just combined.
Using clean beaters, beat egg whites and cream of tartar in a large bowl until medium-firm peaks form. Fold 1/3 of whites into cake batter to lighten, then fold the remaining.
Divide batter into 3 separate bowls. Add a little bit, and I mean little drop, of gel food coloring to batter and mix until it is the color you want that layer to be. Use different colors for each bowl.
Pour batter into lined pans and cook for approx. 15 minutes, check your cake with a toothpick, if it does not come out clean cook for another 5 minutes and check again.
Pull pans out and let cake rest in pans for 10 minutes, then use a knife along the sides of the cake and pan to loosen. Finally, carefully transfer to cooling rack and peel wax paper off.
Repeat all steps for the 4th-6th layers.
You can make the cake layers a day ahead, make sure to wrap them in saran tightly and leave at room temperature.
Icing
Believe me when I say you need A LOT of icing for this cake. It has six layers and you will want icing in between layers as well as it being so tall you will need a lot to cover the outside.
Ingredients
- 15 ounces cream cheese, room temperature
- 3/4 cup unsalted butter, room temperature
- 1.5 (the Kg size) bags of icing sugar
Directions
Divide your ingredients into two batches, this will make it easier to mix. Cream your cream cheese and butter together first. Add your icing sugar a little bit at a time until well combined.
Ice the cake layer by layer, and then the outside. The icing will harden in the fridge so remember if you make it ahead of time give it time to soften again before you ice the cake.
ENJOY! And if you need a nice white cake make this recipe in half and omit the food coloring. This is one of my favorite cakes!

Second Birthday Rainbow Themed Party
My daughter's birthday is in spring (even though the weather out here proved different, it was snowing) so I wanted to have a birthday theme that was bright, cheery and not to frilly. I of course have been all over Pinterest and saw a lot of great ideas for a birthday themed party. Here are just a few of the things I did for her party. I do wish I had taken more pictures, but once there was enough light to do so, I was too crazy busy with all of our wonderful guests!
 These are the favours I made. I took a few sheets of packing paper, but them, and made little rectangle pouches. Then I stamped them, and hand sewed them almost all the way closed. Finally I filled them with Jelly Belly jelly beans and gummy frogs. Great way to do favours on a budget! I will be doing this again!
 I covered a couple tables with paper then put out a few jars of new crayons. This was a good way to keep the little ones busy. I had high hopes this would keep them entertained enough that I wouldn't have too much screaming and running around, but alas with 10 kids under 10 that is bound to happen. The girls at the party really enjoyed this activity.

 I wish I had been able to get a better picture of the tenting I did in the living room. I thought it looked great! And it is another idea on a budget. Buy the large plastic table clothes at the dollar store, fold them in half and pin them on the ceiling with tacks. I will be doing this again! MUCH better than streamers!!!!
 I made up 16 tissue pom-poms and hung them around the house. These are also a lovely decoration to look at, and they don't cost very much to make. You can find the how to on the Martha website here.
 I wanted my son to be a part of getting ready for my daughter's special day. He is in grade one so just learning to read and write. I got him to tell me how to spell how old my daughter is turning, then I printed out the letters in block form, and he colored them in as a rainbow. I LOVE how it turned out, I think I will keep this in the memory box.
This by far took the longest to do out of anything, but worth every bit of time. I made the cake from scratch, using a recipe my mom has used for years from Bon Appetite. It is called a Coconut Bridal Cake. Here is the post for the recipe. Rainbow Cake Recipe


 I made two batches of my cake recipe and divided the batter each time into thirds. I used gel food coloring. It was my first experience with it and what a difference! I won't go back to the liquid stuff again.
This cake was sooooo Yummy and Beautiful!!!!!!!

Favours

Keeping the little ones busy...

Decorations


The Cake!!!!
This by far took the longest to do out of anything, but worth every bit of time. I made the cake from scratch, using a recipe my mom has used for years from Bon Appetite. It is called a Coconut Bridal Cake. Here is the post for the recipe. Rainbow Cake Recipe


Wednesday, 11 April 2012
Do It Yourself Buddha Board
I have always wanted a Buddha Board, it seems so relaxing to paint something and then it disappears and you get to start over again. Now that I have children there are more reasons to want one. If your kids are like mine they LOVE to paint. The problem is that I always find that I spend more time cleaning then they do painting, which is why a Buddha Board would be awesome since you just need water! I could have gone out to buy one, but when I looked they were too expensive for us to buy, so I saw how to make one and I thought I would give it a shot.
My whole project only cost me $4.60!!!!!
 I took the glass and back off the frame, picked out my color and started to paint!
 This is after the first coat.
 My daughter wanted to join me, this is 2 minutes before I had to leave the room for no more than 60 seconds and she took that lovely painting on the couch with her. I had pink paint on my couch, all over her and on my Coach bag. Lesson learned!
 Once the frame dried (and my couch was cleaned) I put the the brush stroke paper in the frame first, then the glass behind it, and then the back of the frame. Put a little water on your brush and paint away!
Supplies
- 1 sheet of Brush Stroke Paper (you can find this at your local art store)
- 1 8x10 Frame (I got mine at the dollar store)
- Acrylic Paint (if you decide you want to make your frame pretty)
Here are the steps I took:


Friday, 6 April 2012
Marbled Easter Deviled Eggs
I wanted to an Easter egg activity but also didn't want to waste our eggs, so I made colorful edible Easter eggs!

Here are the steps I took.
1. Hard boil your eggs. First put your eggs in a pot and then cover 1-2 inches at least over top of the eggs with cold water. Bring to boil, then let them cook for another minute.

2. Take your pot off the heat, cover with a lid and let the eggs cook for another 10 minutes.
3. Take your eggs out of the pot and let them cool down. Next you want to crack the shell without breaking it off or carving into your egg. We used the back of a spoon for this.


4. Pick the colors you would like your eggs to be and spread the food coloring all over the outside of the shell. We used our spoon, but afterwards I realized putting them in a plastic baggie with the food coloring inside would have been much easier.

5. Let the eggs sit with the coloring on for a few minutes, then use some water to clean off the excess food coloring.


6. Very carefully peel off the shell. And you have your marbled hard boiled egg. You can leave them like this, they look great! Or you can carry on with the instructions to make them into deviled eggs.


Monday, 2 April 2012
Herb Crusted Honey Mustard Chicken
This dinner was a HUGE hit at my house. I made this recipe up, and was hoping that it would turn out, I was pleasantly surprised. My daughter (age 2) refuses to eat meat, and she had two helpings of this chicken. I think this is going to become a dinner staple. The chicken is so crunchy on the outside and super moist inside mmmmm!


Ingredients
- 2-3 boneless, skinless chicken breasts cut into cutlets
- 1/2 cup of mayo
- 3 tbl mustard
- 2 1/2 tbl honey
- 2 cups Panko Bread Crumbs
- pinch of oregano
- pinch of rosemary
- salt and pepper to taste
- Pam cooking spray
Directions
Preheat your oven to 375 degrees and spray a baking pan with Pam. Cut your chicken into cutlets, set aside. Mix together your mayo, mustard and honey put 1/2 of mixture aside. Spread your Panko breadcrumbs on a flat plate and mix in your oregano, rosemary and salt and pepper.Coat both sides of your chicken cutlets with your honey mustard sauce, then press it onto the plate of breadcrumbs, cover both sides. Lay chicken on baking sheet, and cook for 25-30 minutes depending on how thick your chicken is.
Serve with remainder honey mustard sauce on top. I served it with a side of rice and organic peas and corn.
ENJOY!
Pins that Have Improved My Life
Just like many of you out there I am hooked onto Pinterest. I have pinned more projects than I can ever manage to find the time to do and more food than I can eat in a lifetime! I have tried out a few pins and here are my favorite.


This is a super easy project that you can whip up in 20 minutes. I found this pin here. It is a kite made from a wire hanger that you can clip all of your little one's bows and barrettes on. This one looks so sweet hung up on the wall too. To make it I first stretched out the hanger to make a diamond shape. Then I straightened out the hook part. I hot glued my fabric to the hanger and then added the cross of ribbon on the front. Then I wrapped ribbon around the part of the hanger where the hook part of it was, glued it in place and left a long piece hanging. I also painted on an A for my daughter's first initial. Both she and I love this project!


This is another really simple project that will mean a lot to you and your family. This pin popped up a lot right after new years, and I just had to try it. Essentially all it is is a jar and you write down things that have happened to you and your family throughout the year, then on New Years Eve you can all gather around and read all the funny, sweet and wonderful things that have happened. I cannot wait to go through these with the kids on New Years Eve!

I have a feeling that Pinterest has a stock in Mason Jars, because you can find a million uses for them on that site! And this is where I started my obsession with any sort of jar. I love the way they look all lined up together, I love how they can organize a messy cupboard, and I love how they keep stuff so well. I have bought a lot of jars at Dollarama (best place by far to get jars). I use them to keep my baking stuff in, and spices. I now just need to buy some adhesive labels or chalkboard paint to put on them...oooh the possibilities! I also have a few that I use for the kids, my Calm Jar, and my Incentive Jar. I will discuss those ones a little later.

http://chocolatecoveredkatie.com/


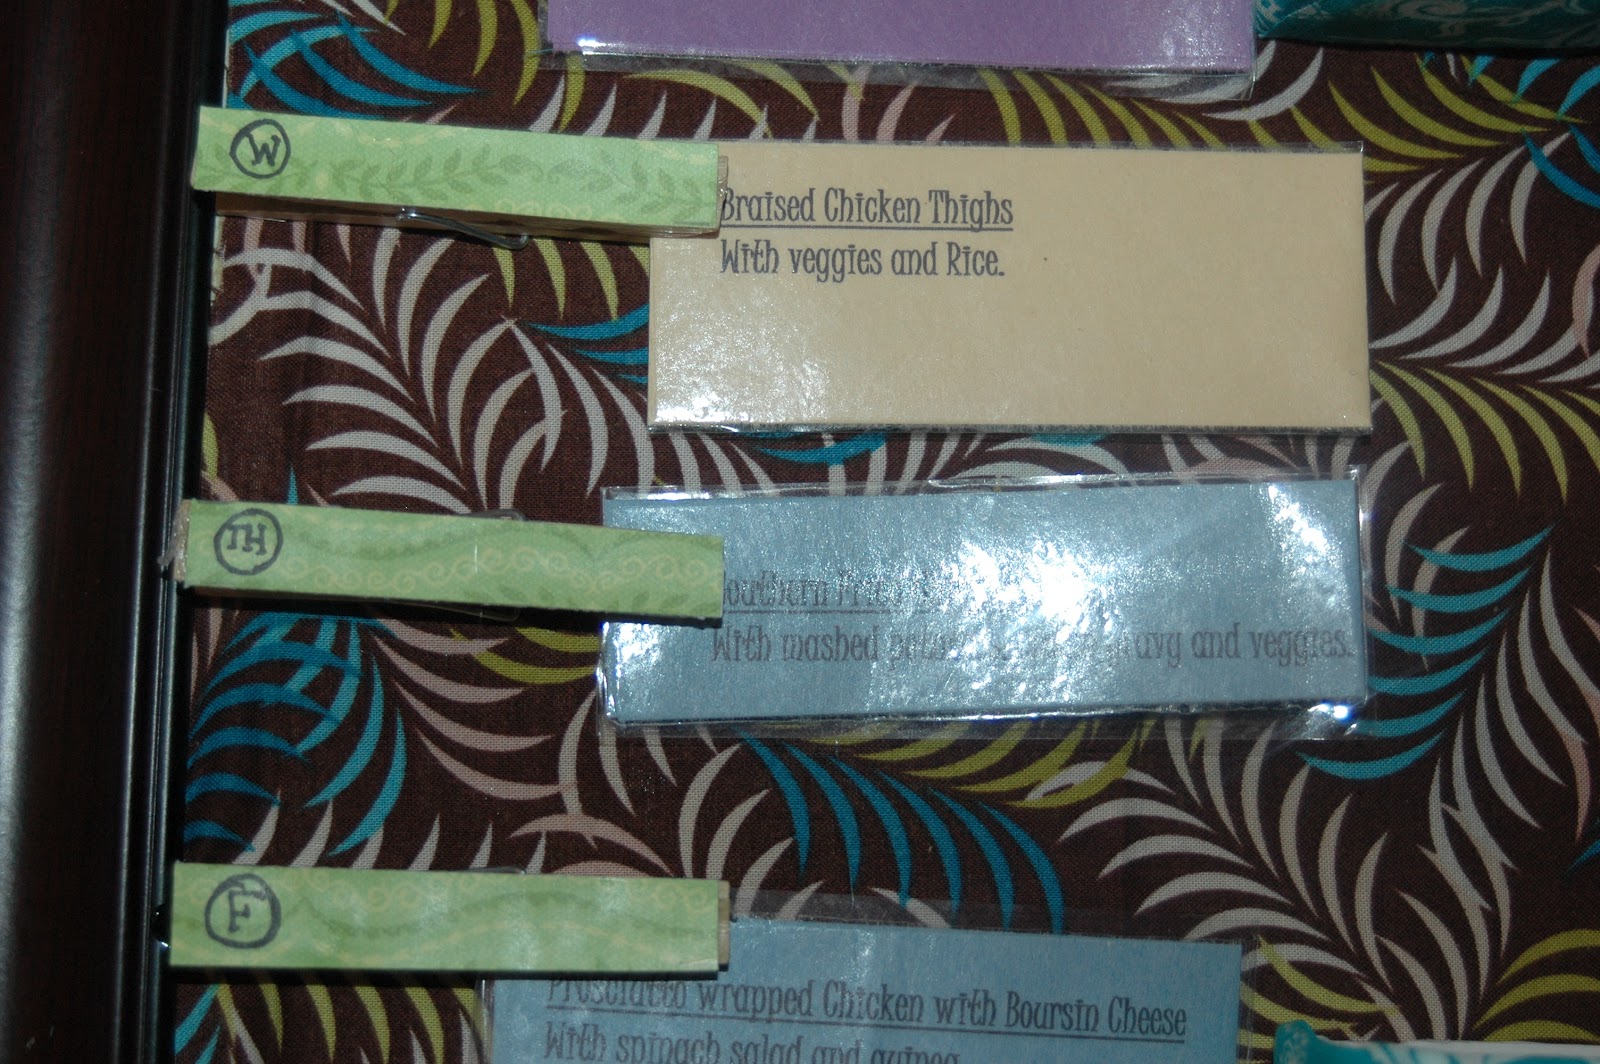
1. Menu Board
I found this wonderful pin and just had to try it out for myself. I have always tried to meal plan, but to sit down and write it out on a calendar just didn't ever seem too fun. Here is the one I made. I just used spare fabric on the back of the frame and on the card holder boxes (made from Dove soap boxes). I made a list of 40 dinners and printed them out on construction paper then cut them out individually, and finally laminated them. I glued card stock onto clothes pins with what day of the week printed on it. I make sure that I add new recipes (that I most likely have also found on Pinterest) every now and then to keep it exciting.


2. Bow Kite
This is a super easy project that you can whip up in 20 minutes. I found this pin here. It is a kite made from a wire hanger that you can clip all of your little one's bows and barrettes on. This one looks so sweet hung up on the wall too. To make it I first stretched out the hanger to make a diamond shape. Then I straightened out the hook part. I hot glued my fabric to the hanger and then added the cross of ribbon on the front. Then I wrapped ribbon around the part of the hanger where the hook part of it was, glued it in place and left a long piece hanging. I also painted on an A for my daughter's first initial. Both she and I love this project!


3. Memory Jar

This is another really simple project that will mean a lot to you and your family. This pin popped up a lot right after new years, and I just had to try it. Essentially all it is is a jar and you write down things that have happened to you and your family throughout the year, then on New Years Eve you can all gather around and read all the funny, sweet and wonderful things that have happened. I cannot wait to go through these with the kids on New Years Eve!
4. Anything to do with Jars

I have a feeling that Pinterest has a stock in Mason Jars, because you can find a million uses for them on that site! And this is where I started my obsession with any sort of jar. I love the way they look all lined up together, I love how they can organize a messy cupboard, and I love how they keep stuff so well. I have bought a lot of jars at Dollarama (best place by far to get jars). I use them to keep my baking stuff in, and spices. I now just need to buy some adhesive labels or chalkboard paint to put on them...oooh the possibilities! I also have a few that I use for the kids, my Calm Jar, and my Incentive Jar. I will discuss those ones a little later.
5. Lunch bins

I LOVE organization, it really does make me feel soo good! I also dislike very much making school lunches, I tended to leave it to the last minute and then I would have stuff all over my kitchen counters in the morning while trying to rush to get everything ready. This pin has greatly improved my mornings! I bought two plastic bins at Dollarama, one for the fridge and one for the cupboard. On Sunday night I cut up all the fruits, veggies, cheese and other refrigerated snacks my son will need for his lunch and then bag them and put them in the bin. Then I bag all of the dried snacks, goldfish crackers, animal crackers, raisins, granola bars, muffins, popcorn and whatever else we have and stick them in the snack bin. Because we buy a lot of our snacks at Costco and in bulk this works great, then I don't have to have huge bags and boxes of stuff cluttering my cupboards. I also find making a big batch of popcorn then bagging it right away in smaller bags helps with my snacking too, makes it easier to grab something healthy when I am wanting something salty.
I put the fridge bin at the bottom of the fridge so that my 2 year old can pick out her own snack when she wants something too, she loves this!
6. Chocolate Covered Katie
I cannot say enough good things about this site!!!!!!!!!! I have been trying to follow my IBS diet restrictions, along with trying to lose weight, but I still love to have treats and this site is my favorite!!!!!!! She makes wonderful decadent treats, but with all healthy and vegan ingredients! There is a chocolate pie to die for that is made with tofu (even my husband who gags at the site of tofu loved it!), cookie dough dip made with chickpeas, 1 minute chocolate cake and sooooooooo many other treats! You HAVE to check out this site and try some of her recipes, you will not be disappointed!http://chocolatecoveredkatie.com/
7. ALL OF THE FOOD PINS!
Pinterest is a foodies heaven! I LOVE looking at all of the wonderful recipes, and I have tried out quite a few of them as well. Here are my favorites:
Four Cheese Ravioli (I made this for Valentines Day)
9. Calm Jar

I sometimes have trouble getting my son to calm down when he is upset or frustrated. I saw this on Pinterest and Facebook so I thought I would give it a shot. It really helps him calm down enough for us to be able to talk about what is going on with him. I will give it to him when he starts to get really angry, I tell him to think about whatever seems to be the problem at the time, and then I tell him we will discuss it after he is calm. I shake the jar and he knows to just watch it until all the glitter has settled. He has even started to ask for the calm jar when he gets upset. I really like this idea, it gives both of us the time to collect our thoughts, rather than trying to deal with him right away which never seems to be a good idea.
10. Incentive Jar

This is a new one for us in the last couple days and I am already seeing the benefits of it. I bought a bunch of Jelly Belly's and filled a jar with them. I told my kids that they have to earn a jelly bean if they would like one. In order to earn a jelly bean they must clean something up without being asked to. It can't be something like making their bed or cleaning their room because that is already expected of them, they must find something that is out of their usual chores to do all on their own. My son has really got into this, he is cleaning up messes before I can even think of getting to them.
Subscribe to:
Posts (Atom)